#Github desktop version
Explore tagged Tumblr posts
Visit Tumblr Blog
Explore Tumblr blogs with no restrictions, modern design and the best experience.
Last Seen Tumblr Blogs


Fun Fact
Tumblr was the first site to host the blog for President Barack Obama in 2011.
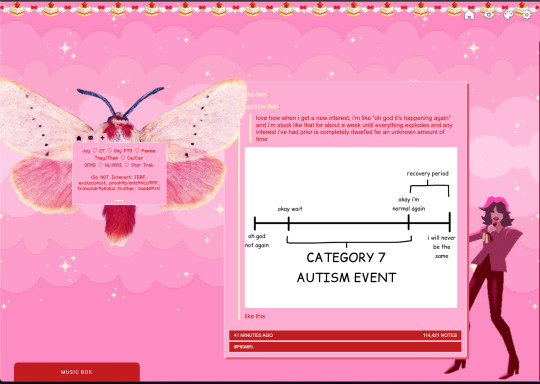
Text


So, I make all of my devices look like old windows operating systems, usually Win7 cuz I'm a big fan of Aero Glass. I've got my Win11 laptop looking like XP, My Linux Dual Boot on pink Win7, My Linux Tablet on Blue Win7, and now my Win 11 desktop on pink Win7.
Here's how I do it.
For windows 10/11 there are a few ways. WindowBlinds 11 (WB11) is a good resource for this, but it's a paid program. Which kinda sucks. If you can't afford it you can find my sympathies in a button on my neocities. In an unrelated note, there's a github user named Discriminating who does some pretty cool windows styling programs. WB11 is how I style my two windows devices. The aero glass styling is done through WindowBlinds and also Start11, another Stardock program. The style I used for that is Aero 11 (set to blush :3) For the XP system (and older if you want it) I use RetroBar to style the taskbar and OpenShell to style the start menu. The WB11 style I use is eXperience11, but there are others as well. Of course, for MSN/Windows Live Messenger I use Escargot but if you're more into AIM or Yahoo! Messenger then you can check out their companion project Nina. You'll of course have to fiddle around with settings but eventually you'll get it looking good. If you want to go crazy with customization there is also Customizer God, however I've had no success getting it to work on Windows 11.
Linux is the easiest to configure to make look retro. Specifically you want to use some kind of KDE Plasma version of Linux. I use Kubuntu. Basically all you have to do for these is dig around in the app store for themes relating to "aero" "aero glass" and "windows 7" and apply them until you're happy. I don't really have any specific suggestions for that but it's very easy to do if you install Kubuntu or any KDE Plasma Linux. Basically you can find anything and everything you need in it.
There's one other thing I've not yet been able to set up but it's on my radar for my campus computer: ReactOS. I'll make another post when I'm able to try it out but if you're curious go nuts, install it in a virtual box or on a usb or directly over your main drive. God is your oyster.
One last thing, Space Cadet Pinball still runs perfectly on Windows 11
Edit: Suggested by @tetrachromacy4 (thx~!!!) GadgetPack offers a windows 7 sidebar. It is listed as 7/8/10 compatible so it will likely work on windows 11 but I have not yet tested it.
#oldweb#old web#old internet#internet nostalgia#old tech#old graphics#windows xp#windows 7#y2k nostalgia#y2kcore#y2k aesthetic
230 notes
·
View notes
Text
on the topic of writing software
I want to ramble at you about some writing software options. 98% of the time I'm perfectly content with LibreOffice Writer (and previously I used Word, back when Microsoft products were less shitty). But every now and then when I have a new project (like now - more on that later) I start looking for something shiny and new to try. And I fell down into another research rabbit hole lol
I usually don't talk a lot about this bc my needs are very simple, and not sure how useful my opinion is to others, but I enjoy the topic. It's an intersection of creative writing and tech nerdiness and I like both of those things. Also what writing software you prefer really depends on the type of writer that you are, and everyone has a slightly different writing process and I find that fascinating.
Now, as I said, I'm coming at it from a slightly tech-nerd angle. I don't care if the installation is clunky, I'm happy to see the words open-source, and the need to create an account will already mildly piss me off (:
Don't worry, I'm not as intense as the guy writing his novel in Vim. Though fucking respect. And I can't say I'm not tempted to try it even with the steep learning curve lmao (Seriously, if you don't know Vim is notorious among software developers.)
Anyway, things I've tried so far:
Manuskript: this was listed as an open-source Scrivener alternative (though I haven't tried Scrivener. so.). I gave it a go when I was writing heart worth the trouble and it was pretty nice. It helped me when I had to move scenes and chapters around. But overall I think it was made with plotters in mind bc it wants you to enter a lot of information upfront. I'm not a planner/architect type of writer so this type of software is a bit overwhelming for me. Still, the fact that it's open source and works on Linux gets kudos from me.
Wavemaker: I recently played around with this, and I actually surprisingly like the features it has. You can put multiple books in a project, which is very nice if you like to work on different things, like fanfic, novels, etc. The mindmap is a feature I liked, though it's a bit clunky bc it collapses the text fields when you exit, and once I added an image field by accident that I could never remove lol I do like a bit of a snowflake method, so that feature is cool, and the cards are pretty straightforward too. Usually, my problem with these apps is that I don't even want to touch half of the features so they are pointless to me, but the features of Wavemaker were kind of nice. It's a web app that you can download and use offline but it's still working from your browser if that makes sense. That was what I didn't really appreciate. Also, it doesn't give you a lot of options to back it up. You either save the wavemaker file, export it into a document (which is fine, but it adds an extra step to the backup process) or you sync with Google Drive *shudders*
Things I want to try out:
Calmly Writer: now this is just purely a text editor that focuses on being very zen, streamlined, distraction-free, etc. It's pretty and it has typewriter sounds. (Yeah, I'm not immune to a pretty UI and harmless fun features alright? I can contain multitudes :P) It has an online version, but you can also download it, and works on Windows, Mac, and Linux. On paper, the desktop app requires a license, but the way they put it is that you can evaluate it for free and the evaluation doesn't have an enforced time limit... So. As good as free. (Though if I really like it, I would totally consider buying a license for 20usd that I can use on 3 computers, that seems fair. I appreciate a license over a subscription model for sure.) Honestly, I think this is the one I'm going to try next bc it just integrates perfectly into my writing process. That being: a multitude of messy, hand-written notes and notebooks + a document editor + backups on hard drive and GitHub (yes, really) ^^"
Shaxpir: This is on the opposite end of the spectrum basically, but out of the "fancy" ones, I kind of like the look of this the most. I like the statistics part in particular. But honestly, I probably won't try it bc it doesn't have a Linux version which would be a pain in the ass for me, and is cloud-based. I kind of don't really trust them, which is my biggest issue with these companies. (Although the creator's heart seems to be in the right place when it comes to AI. Basically, some of their features are based on machine learning and language models. For example, it will recognize passive voice, if it's an adverb with "-ly" or the emotion of a word. Which I think is all cool and fine and shouldn't be lumped in with generative AI. But he also had a website that did this analysis for already published works, and when people pointed out that it was sketchy, he took that down and I can respect that. I'm not sure how much it influenced the actual features of the app, maybe I'll just take a peek out of curiosity. The whole thing does make me have trust issues though lmao) If anyone has experience with it though, I'm interested to hear about it.
Obsidian: not a dedicated writing software, but rather an elaborate note-taking app. I heard good things about it from smart people lol If I really wanted to access my writing on my phone, I would probably use this bc it works on every platform and has end-to-end encrypted sync with version control. I heard you can also integrate it with GitHub which is always music to my ears lol But the setup probably takes a bit of time and I'm not particularly motivated to do that right now.
So yeah, those are the options that appeal to me right now. If anyone used these and has opinions, I'm all ears :D
137 notes
·
View notes
Text
The main reason to use Firefox and Linux and other free and open source software is that otherwise the big tech monopolies will fuck you as the customer over in search of profits. They will seek to control how you use their products and sell your data. When a company dominates the market, things can only get worse for ordinary people.
Like take Google Chrome for example, which together with its chromium reskins dominate the web browser market. Google makes a lot of money from ads, and consequently the company hates adblockers. They already are planning to move to manifest V3, which will nerf adblockers significantly. The manifest V3 compatible chrome version of Ublock Orgin is a "Lite" version for a reason. Ublock's Github page has an entire page explaining why the addon works best in Firefox.
And Google as we speak are trying to block adblockers from working on Youtube, If you want to continue blocking Youtube ads, and since Youtube ads make the site unuseable you ought to want that, it makes the most sense to not use a browser controlled by Google.
And there is no reason to think things won't get worse. There is for example nothing stopping Google from kicking adblockers off their add-on stores completely. They do regard it as basically piracy if the youtube pop-ups tell us anything, so updating the Chrome extensions terms of service to ban adblocking is a natural step. And so many people seem to think Chrome is the only browser that exists, so they are not going to switch to alternatives, or if they do, they will switch to another chrominum-based browser.
And again, they are fucking chromium itself for adblockers with Manifest V3, so only Firefox remains as a viable alternative. It's the only alternative to letting Google control the internet.
And Microsoft is the same thing. I posted before about their plans to move Windows increasingly into the cloud. This already exists for corporate customers, as Windows 365. And a version for ordinary users is probably not far off. It might not be the only version of Windows for awhile, the lack of solid internet access for a good part of the Earth's population will prevent it. But you'll probably see cheap very low-spec chromebookesque laptops running Windows for sale soon, that gets around Windows 11's obscene system requirements by their Windows being a cloud-based version.
And more and more of Windows will require Internet access or validation for DRM reasons if nothing else. Subscription fees instead of a one-time license are also likely. It will just be Windows moving in the direction Microsoft Office has already gone.
There is nothing preventing this, because again on the desktop/laptop market Windows is effectively a monopoly, or a duopoly with Apple. So there is no competition preventing Microsoft from exercising control over Windows users in the vein of Apple.
For example, Microsoft making Windows a walled garden by only permitting programs to be installed from the Microsoft Store probably isn't far off. This already exists for Win10 and 11, it's called S-mode. There seem to be more and more laptops being sold with Windows S-mode as the default.
Now it's not the only option, and you can turn it off with some tinkering, but there is really nothing stopping Microsoft from making it the only way of using Windows. And customers will probably accept it, because again the main competition is Apple where the walled garden has been the default for decades.
Customers have already accepted all sorts of bad things from Microsoft, because again Windows is a near-monopoly, and Apple and Google are even worse. That’s why there has been no major negative reaction to how Windows has increasingly spies on its users.
Another thing is how the system requirements for Windows seem to grow almost exponentially with each edition, making still perfectly useable computers unable to run the new edition. And Windows 11 is the worst yet. Like it's hard to get the numbers of how many computers running Win10 can't upgrade to Win11, but it's probably the majority of them, at least 55% or maybe even 75%. This has the effect of Windows users abandoning still perfectly useable hardware and buying new computers, creating more e-waste.
For Windows users, the alternative Windows gives them is to buy a new computer or get another operating system, and inertia pushes them towards buying another computer to keep using Windows. This is good for Windows and the hardware manufacturers selling computers with Windows 11 pre-installed, they get to profit off people buying Windows 11 keys and new computers, while the end-users have to pay, as does the environment. It’s planned obsolescence.
And it doesn’t have to be like that. Linux distros prove that you can have a modern operating system that has far lower hardware requirements. Even the most resource taxing Linux distros, like for example Ubuntu running the Gnome desktop, have far more modest system requirements than modern Windows. And you can always install lightweight Linux Distros that often have very low system requirements. One I have used is Antix. The ballooning Windows system requirements comes across as pure bloat on Microsoft’s part.
Now neither Linux or Firefox are perfect. Free and open source software don’t have a lot of the polish that comes with the proprietary products of major corporations. And being in competition with technology monopolies does have its drawbacks. The lacking website compatibility with Firefox and game compatibility with Linux are two obvious examples.
Yet Firefox and Linux have the capacity to grow, to become better. Being open source helps. Even if Firefox falls, developers can create a fork of it. If a Linux distro is not to your taste, there is usually another one. Whereas Windows and Chrome will only get worse as they will continue to abuse their monopolistic powers over the tech market.
846 notes
·
View notes
Note
Do you have a more up to date link for a hacked spotify for android? I found your post from 2022 but the link doesn't have a version that's up to date with the version of spotify I have.
Thanks 💚
Not exactly. I actually don't use the hacked Spotify app anymore. I prefer Spotube, a free open-source app that interfaces directly with the Spotify web API. It also let's you download songs and albums directly, which the hacked app didn't do!
Overall Spotube is more stable, trustworthy (because the code source is open and community-audited), and will never be at risk Spotify patching the hack or disabling your account for violating terms of service, because it uses 100% legal software.
(P.S. the first link leads to F-Droid, an alternative app store for free, community-driven, open-source apps. That's where you can also download NewPipe, my favorite ad-free youtube app.)
#Spotify#Foss#Fossware#Libre#open source#Open-source#FLOSS#Spotube#Ad free#Adblocking#Adblocker#Ad free Spotify#Spotify Premium#Spotify ads
184 notes
·
View notes
Text
A Guide To Ripping Sonic x Shadow Generations Models
This guide is meant as a walkthrough to how to rip models from the PC version of SxSG. While this process and programs will work with the Nintendo Switch version, I cannot promise the decompilation and file directories will be the same, especially as there is a massive quality difference in the assets between the two versions.
I recommend already having fundamental computer literacy and pre-existing familiarity or experience with 3d models and programs such as Blender. I'll be using Blender here.
Now, lets begin!
What You Will Need
A PC version of Sonic x Shadow Generations, whether through Steam or Epic Games, installed on your computer. Please make sure you know where the file directory for your game is. for Steam, you can easily access this via the Properties menu for the game in your Steam library, Installed Files, and then Browse.
For Steam, your directory should look something like: Program Files (x86)\Steam\steamapps\common\SONIC_X_SHADOW_GENERATIONS
PLEASE make sure youre keeping track of which files are modified, if at all. While you can create new files and folders in your game directory without issue, you may break your game if you modify or delete existing files. If you encounter a problem, you may need to Verify the Integrity of Game Files (through Steam), or uninstall and reinstall your game entirely. You may want to Backup your game files just in case.
A 3d program for importing and previewing 3d models, such as Blender. Blender will be the program used in this tutorial.
Tools You Will Need
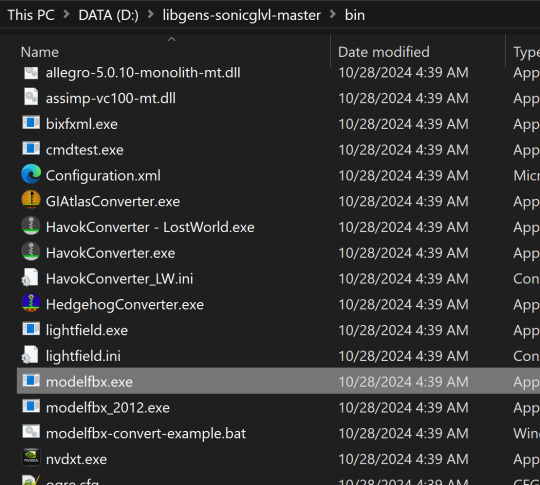
HedgeArcPack from HedgeLib - A program used for the decompilation of Hedgehog Engine .pac and .ar00 archive files. Currently works on all Hedgehog Engine games (Unleashed - SxSG). HedgeLib is a larger library of programs for ripping Hedgehog Engine assets. Modelfbx from LibGens - LibGens is a library of tools for modding and editing Hedgehog Engine asset files, originally a Level Editor for Sonic Generations. Modelfbx converts .model files to .fbx files for use in 3d programs. There are a bunch of other fun modding tools in here as well. NeedleTextureStreamingPackage from SkythTools - An extractor for the texture data of the dds files used in some Frontiers and Shadow Generations models. Not all models will need this. Part of SkythTools, a library of tools for modding and extracting assets from Hedgehog Engine games. I recommend reading through the page and seeing what all the other tools do and if theyre something you'd also want to use!
Both LibGens and SkythTools do not have a Releases page on their Github pages, so just download the master archive as a zip file as normal. All programs here work with drag-and-drop, meaning you drag and drop the files directly onto the .exe file. Do not open the .exe files. (nothing will happen if you do, it simply will not work.)
After downloading all three libraries in your preferred location, open your game directory.
Unpacking The Model Archive Files
Now that you have your game directory open, you'll need to locate the model archive you wish to rip. All of the assets for Shadow Generations is located in image > x64 > raw in your game's base directory. Lets rip Maria's model.
Maria and other characters are located in the character folder. You'll need to find maria.pac.


Open a separate file explorer window to where you have HedgeArcPack.exe. For simplicity's sake, Ive put it on the desktop. Drag and drop the maria.pac file directly onto the exe file.

By default, it will unpack the archive in the original folder with the name of the archive you unpacked.
In this new maria folder, you'll find a lot of files. Dont be intimidated - these are simply the raw files for all of the model's dependencies and assets, including animations, dds files (texture files), and more.
A quick glossary: - .model - the base model file in native format. This is what youre looking for. - .dds - the texture files for the model. You will need these for importing and previewing the model in a program, as well as exporting it. - .material - the material data for the model for Hedgehog Engine 2. You wont need these so as long as you have the texture files on their own. - skl.pxd - the skeleton data for the model for Hedgehog Engine 2. - .anm.pxd - this is the file format for compressed Hedgehog Engine 2 animations the model uses. They can be opened using a plugin like FrontiersAnimDecompress, however this isnt a tutorial for how to use those. Feel free to ask for a tutorial on how to extract game animations or look it up on your own time, though!
Before we can convert and import the model to Blender, though, we'll need to extract the texture data.
Extracting the Textures
Note: not all models, such as bosses like Mephiles or Black Doom, will require this step. However, Maria's does.
Open a file explorer window to where you downloaded SkythTools. Make sure you have already unzipped the file. In SkythTools-master, go to Sonic Frontiers, and find NeedleTextureStreamingPackage.exe.

In the needle_texture_streaming_path.txt file, copy the file path for your Texture_Streaming folder in your game directory, then save the file. This is the path the program will use to extract the texture data for the .dds files.


Once that's done, you will need to drag and drop each .dds file onto the .exe one-at-a-time. Maria has multiple .dds files for different parts of her model, such as her eyes and hair, so make sure you do this for every one of them.

If youve worked with 3d models and textures before, you may recognizes some of the suffixes used for the texture files. Hedgehog Engine games use pbr texture maps. abd is the albedo map, nrm is the normal map, prm is the map for Metalness, Roughness and Specular, ems is the emission map, etc.
Now we can finally convert the model for use in 3d programs!
Converting and Importing the Model
We're in the homestretch! Finally we'll be able to preview and use our model. But first, we have to convert it to an .fbx.
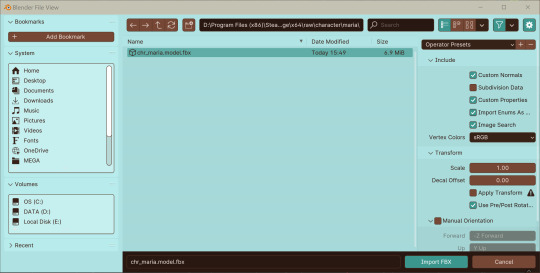
Just like before, open a file explorer window to where you have LibGens downloaded (make sure you have already unzipped it). Go to the bin folder. This time, youre looking for a program called modelfbx.exe.
Find your .model file in your unpacked archive. Drag and drop it onto the exe.

It will create an .fbx file conversion of the .model file.
Now, we can finally open Blender!
I am using Blender 4.1.1 here, though the version doesnt matter as long as it is 2.8 or higher, as Blender has an fbx importer by default.
Like you would any other fbx file, go to File > Import > fbx (dont mind my Choco Mint blender theme here)

You'll need to navigate all to where you converted that fbx file. (Alternatively, you can copy that fbx file to somewhere else for ease of access, I just like keeping everything in one place).
Import the fbx. You may notice that by nature of an fbx file, the albedo texture for the base model is already mapped to the model when you switch to Viewport Shading. However, sometimes, part of the model will be magenta, meaning we have a texture pathing error.
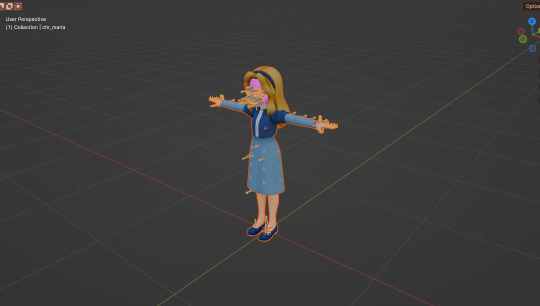
Hiding the bones, she looks a lil scary here--
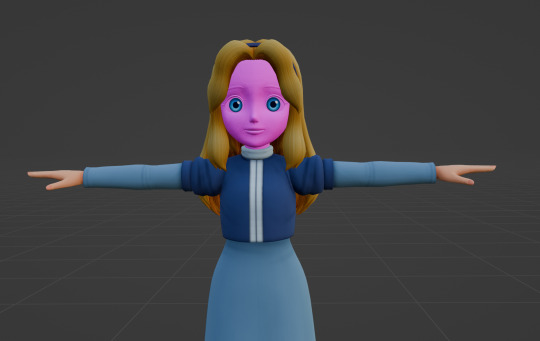
Opening the material data for the mesh, you can see where our problems lie. The texture map for her face has a file path that does not exist.


Its pretty easy to fix this - just open the albedo file for her face texture and map it to the material. You can simply drag and drop the dds file into the node editor in blender - blender can read the dds files just fine since weve extracted the texture data from them earlier.
Pathing errors can either happen as a result of the fbx file being wonky or if you havent properly extracted all the texture data for the dds files, so keep that in mind!

If you simply wish to view the models in their base colors, you can stop here. However, you can also set up the normal and prm maps for use in 3d renders or exporting the model!
The prm maps for Frontiers and Shadow Generations work a little differently than in other games. Instead of Red = Metalness, Green = Roughness, Blue = Ambient Occlusion, and Alpha = Specular, Frontiers and Shadow Generations uses Red = Specular, Green = Smoothness (inverted Roughness), and Blue = Metalness.
Setting this up in Blender is quite easy - simply drag and drop the respective prm, fal and nrm and other dds files into blender for their respective maps in the material editor.
If you already know 3d, you already know how to set up a normal map in Blender. Simply take the normal map, set the Color Space to Non-Color, then path it into the Normal Map node.

For the unique prm maps, you will need to create a Separate Color node, then plug Red into Specular > IOR Level (make sure Distribution is set to GGX, not Multi-Faceted GGX), Green through an Invert Color node > Roughness, and Blue > Metallic.
Overall, your node editor should be set up something like this for each material.

(I know it looks intimidating, but I promise its super quick and easy to set up - dont give up!)

And now we have our ripped model! You are now free to pose, deconstruct, play with, do whatever you please with it. Please note that if you want to export your model, you may want to convert the texture files to png using a program like Noesis. I hope this helps, and have fun!
#once again for other maps like the emissive map for Maria's eyes and etc you'd set them up like any other pbr texture#sonic x shadow generations#sxs gens#sxs generations#sxsg#sxsg dark beginnings#shadow generations#sonadow generations#shadow the hedgehog#maria robotnik#ripping guide
20 notes
·
View notes
Text
hey friends if you're like me and you don't wanna pay for music but you also like the customization and social features of spotify, here's what i use to bypass the limitations!!
spotx on github is a modified version of the desktop client that blocks all ads, and has several optional features like hiding podcasts from the homepage if you just use it for music, and blocking automatic updates to avoid incompatibility. it's currently only available on windows, but all you need is to have the official spotify app already installed!
and here's a modded apk of the mobile app for android! i've been using this for months and i believe it's safe, the only slight annoyance is that you HAVE to manually reinstall the latest version when it updates, but it'll notify you. just make sure you DON'T already have the spotify app installed - it doesn't override any features, it's an entirely seperate app.
i don't know what the alternative would be for ios so if anyone has one, feel free to let me know and i'll add it to the list!
238 notes
·
View notes
Note
Hello! I apologize if this is a presumptuous question or isn't the right place to ask, but is there a place you share the css code for your AO3 skins? I was very excited about your Hesperus skin, but I couldn't find where you might post about your skins beyond progress posts.
I'm going to be posting the new skin on GitHub in the future.
Unfortunately, Hesperus has been cancelled. There were a lot of issues with it and things I don't like, and then my computer self corrupted its entire storage and I lost pretty much everything, most of Hesperus included.
I still have an older version of it, but that specific backup didn't have any notation, which is how I remember what parts of the CSS do what, and was long before I properly optimised its layout. Not to mention, it has some bugs present that weren't there a year ago.
If you really really want it. Here's a file I just put together with all three parts. And here's all the images it's linked to. Make sure to download them all because if I ever take it down to free up space you'll have to host and re-link them yourselves.
To get the mobile overlay to work, you have to add both the tablet (set as max-width 62em) and mobile (set as max-width 42em) skin as parents to the main skin, (they overlap to get to the correct layout).
And please 🙏 don't bug me about issues with it. There's a lot. I know. Feel free to try and fix them yourselves.
Edit: The fonts used on desktop that you need to install [Josefin] [Open Sans]. Not fully needed since I've set them to default to something else, but probably the best to use since I tested the layout most with them.
5 notes
·
View notes
Text
Switching to a new version of my OS means reinstalling all the fun little tools I use <3
Some of them:
kid3-qt: Editor for audio metadata, has GUI
ffmpeg: Only everything that's good and holy in the world. Can do all kinds of things with multimedia files and lots of other programs depend on it because it's just so awesome. Terminal based but really worth learning about. The holy grail aka 'batch conversion command to make an mp3 of everything in a folder that I found on Stack Exchange once and have been using for 8 years':
for f in *.*; do ffmpeg -i "$f" -b:a 320k "mp3/${f%.*}.mp3";done
yt-dlp: Feature-rich YT downloader, also terminal based. Refer to the extensive documentation on GitHub for a complete list of commands.
Pix: Comes pre-installed now, but the handiest little image editing tool I've found for Linux. It lets you - among many other things - crop images with a golden ratio overlay! Or with the rule of thirds if *scoff* if that's good enough for you (I'm biased, I love the golden ratio). Yes, Photoshop lets you do that too, but I don't usually have the same standards for free little Linux programs as for Photoshop.
KolourPaint: The closest thing to MS Paint that Linux seems to have. Seems a little buggy on 22 but I'm keeping it for now.
qRedshift: Applet that manages the brightness and colour of your screen. Better than Nightlight imo. Also has an automated night mode though.
Kazam: Lets you film your screen. Intuitive GUI.
Handbrake: 6MB, a GUI, and it lets you rip DVDs, what's not to love?
xkcd comics viewer: I don't actually use this but I found it this morning and it just has to be mentioned: This is a desklet that puts the xkcd comic of the day on your desktop every day! Isn't that cool? I'd get annoyed seeing the same comic ten times a day but it's just such a fun idea to make something like this!
5 notes
·
View notes
Text
yt-dlp: An Installation and Use Guide
This guide specifically walks through how to download and use yt-dlp on Windows, but if you have a Mac, you should still be able to follow along. Just make sure to download the Mac version of software whenever the option comes up. I'm also going to be assuming that you have a 64-bit Windows system. The standard today tends to be 64-bit for PCs, but if you're not sure and you want to double check then go to Settings -> System -> About -> Device Specifications -> System Type.
This guide also focuses on the command line version of yt-dlp (accessed on Windows by typing cd in the search bar). If you prefer to access the program through a GUI, you'll need to download additional software. Here's a link to help you get started. (LINK)
If you have any specific questions that you can't find an answer to within the linked resources, feel free to reach out and I'll do my best. Also, as someone who can be incredibly computer illiterate at times, I'm writing this guide in a way that explains a bunch of things I used to be confused about, so sorry if it goes over something in too much detail.
Resources:
These are just some handy links in case you run into a problem.
The yt-dlp GitHub page (has literally everything you might need)
The r/youtubedl wiki, includes a list of common errors and FAQs
Installing:
Click on this link. It will take you directly to the section on the yt-dlp GitHub page where you can download the program.
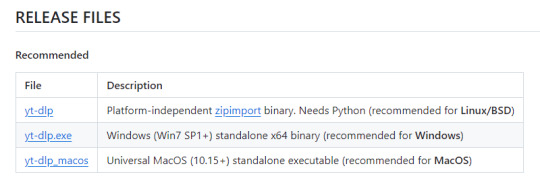
Feel free to download whichever version works best for you, but I recommend scrolling down to RELEASE FILES and downloading the version that works for your system from the Recommended section. I've included a picture below.
Once you've clicked on your version (yt-dlp.exe for Windows users), yt-dlp will download automatically. It should show up in your Downloads folder.
FFmpeg:
To merge video and audio files (which helps you get the best quality from youtube possible), you also need to download FFmpeg.
Scroll down even more to the DEPENDENCIES section.
Click on that first link. It will take you to the FFmpeg webpage. Clicking on Download in the sidebar will take you to a page full of different versions of FFmpeg. DO NOT CLICK on the big green button in the middle of the page. What we need is a version that is already compiled.
Find the section that looks like this (titled Get packages & executable files):

If you're Mac, pick accordingly. If you're Windows or even Linux, I actually recommend you download from this webpage. It contains the same versions as the Windows builds by BtbN but is instead managed by the developers of yt-dlp.
Find the one titled "ffmpeg-master-latest-win64-gpl.zip" (I've included a highlighted picture below for reference).

That will download and go into your Downloads folder too.
Setting up a Folder:
The easiest way to use yt-dlp is by placing it and FFmpeg into a folder. You can store the folder wherever you want, but you will need to remember (and type out) the path to the folder every time you want to use yt-dlp, so I recommend not making it too deep.
What I did was make a folder titled "yt-dlp" within my Desktop folder.

Move the yt-dlp application from your downloads folder to your new yt-dlp folder.
IMPORTANT: Assuming you also placed the yt-dlp folder into your Desktop folder (and assuming you are a Windows user), then the full path to your new yt-dlp folder should be C:\Users\YOUR_USERNAME\Desktop\yt-dlp. Fill YOUR_USERNAME in with whatever your profile is called on your PC.
For the FFmpeg zip you downloaded, extract the zip file into your new yt-dlp folder by clicking the zip, clicking Extract all from the tool bar, and then entering the path to your yt-dlp folder. Everything within the zip is already stored into a folder, so you don't need to create a new folder just for FFmpeg.
Now you're ready to go!
Using:
This section is going to be almost exclusively Windows-focused because I've never used a Mac before and I don't know how the Mac command line varies from the Windows one. I'm also not going to go into any details. If you want more info or to explore the options, I recommend checking out the links in the Resources section.
Type cd and then press enter into the Windows search bar to bring up the command line. If you've never used the command line before, this is what it looks like:
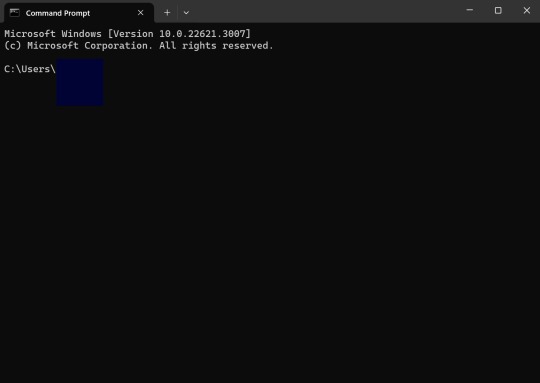
I covered up my username with that blue square.
Type the following into the command line:
cd Desktop cd yt-dlp
This will take you to the same place where your yt-dlp application is stored. You must cd into the appropriate folders every time you want to use yt-dlp.
YouTube, Twitch, and Most Websites:
Find a link to whatever YouTube or Twitch video that you want.
Into the command line, type yt-dlp followed by the link you want to use. This is what it should look like (the red is what you type):
C:\Users\YOUR_USERNAME\Desktop\yt-dlp> yt-dlp https://www.youtube.com/watch?v=hECaXfk2Wo4
Press enter and viola! Your video should download! It will automatically go into your yt-dlp folder.
Twitter:
Twitter forces you to log into an account to view a video, so you have to give yt-dlp your account information if you want to download anything. I understand being wary of doing this.
The easiest way of going about this is by typing:
yt-dlp https://www.youtube.com/watch?v=hECaXfk2Wo4 -u YOUR_TWITTER_USERNAME -p YOUR_TWITTER_PASSWORD
And then your video should download as normal.
Alternatively, you can use your browser cookies as explained here.
Updating:
Here is the section on the GitHub that explains updating. Basically, type yt-dlp as if you want to download a video, but instead of also adding the link, add -U at the end.
Uploading:
If you want to upload a video or clip to tumblr and it's not working, my number one advice is to rename the video file to something simple and add .mp4 at the end. If that doesn't work, try converting it (either with yt-dlp itself or an online website). Sometimes you just have to fiddle with things before they work the way you want. Good luck!
#yt-dlp#youtube-dl#speaking#i generalized this but i use yt-dlp almost 99% for various clips which is why I'm putting this post here for you guys
14 notes
·
View notes
Text
How to host local Club Penguin Private Server (CPPS) on Silicon Mac (M1/M2/M3) thru play.localserver & Solero's Wand install.
I spent so long looking for a solution to this that I want to contribute what worked for me. I got so frustrated looking for something that worked, and I hope this guide will help others avoid that frustration.
This is NOT a guide on hosting or serving a CPPS. This is a guide on making a CPPS playable by locally hosting your server on your Silicon M1/M2/M3 Macbook. This worked on my M3 Macbook, and, in my experience, it seems the newer the hardware/operating system gets, the harder it is accomplish this.
DISCLAIMER *I do not know very much about this topic. I can paste commands into terminal and execute them, I know how to install DMG files I downloaded from the internet (the bar is in hell, I am aware), and I know how to enter play.localhost to run this in a browser. I am no expert; this guide is for beginners like myself who want a CPPS. This is beginner-level stuff. If you want advice or need help hosting, refer to the Wand Github page, Solero's Dash (an actual web-hosting solution for Houdini/Wand), Solero's discord, or, when in doubt, Google it. (I recommend only asking for help in Solero's discord for help AFTER trying your best to search for a solution, and even after that, trying to search key terms in their chat logs. They often have to repeat the same advice over, and over, and over again.)*
TLDR; IDK shit about shit
USING WAND INSTALLER
wand description from github: Wand makes it easy to configure dash, houdini and a media server utilizing docker & docker-compose.
All the assets are located here.
Installation instructions from the above link:
Installation script 1. run the script: bash <(curl -s https://raw.githubusercontent.com/solero/wand/master/install.sh) 2. Answer Questions which are: Database password (Leave blank for random password) Hostname (example: clubpenguin.com) (Leave empty for localhost) External IP Address (Leave empty for localhost) 3. Run and enjoy. Run this command: $ cd wand && sudo docker-compose up
The steps I took:
1. Install Docker via Terminal & Homebrew.
Installing the Docker DMG file did not work properly when I tried. I realized later that Docker is seperate from Docker Desktop (the DMG file). I got Docker to work by using Terminal to install Homebrew, and then using Homebrew to install Docker.
Indented text = paste into Terminal.
Command to install Homebrew:
/bin/bash -c "$(curl -fsSL https://raw.githubusercontent.com/Homebrew/install/HEAD/install.sh)"
Ensure Homebrew is installed:
brew --version
Install Docker:
brew install docker
Recommended: Install Docker Desktop (useful in determining if your server is running, stopped, or stuck in a restart loop).
brew install --cask docker
Run Docker Desktop:
open -a Docker
2. Run installation script:
bash <(curl -s https://raw.githubusercontent.com/solero/wand/master/install.sh)
From Github instructions:
Answer Questions which are:
Database password (Leave blank for random password)
Hostname (example: clubpenguin.com) (Leave empty for localhost)
External IP Address (Leave empty for localhost)
3. $ cd wand && sudo docker-compose up
This is what is provided in the Github. This command didn't work on Mac; I believe it's formatted for Linux OS. Here's how I broke it up and enabled it to run from Mac's Terminal.
Navigate to Wand directory:
cd wand
Double-check if you're in the right directory:
ls
Start Docker container:
docker-compose up
If the above doesn't work, try
docker compose up
or
brew install docker-compose
Takes a second...

Ensure Docker is running:
docker info
If it isn't, open the Docker Desktop application.
*After using compose up, this error may appear:*
WARN[0000] /Users/[user]/wand/docker-compose.yml: the attribute version is obsolete, it will be ignored, please remove it to avoid potential confusion
This is harmless. If you get annoyed by errors, this can be solved by:
nano docker-compose.yml

See Version 3.7 at the top? Delete that line.
Ctrl-X (NOT COMMAND-X) to exit, Y to save, Enter.
PLAY.LOCALHOST
Type http://PLAY.LOCALHOST into a browser.

Create a penguin.

Try logging in that penguin:

This step was agony. I'm not savvy with running obsolete or deprecated software, and, of course, Club Penguin (and Houdini/Wand's assest) uses Flash, which was discontinued, and timebombed by Adobe, in 2021.
I tried Ruffle. Club Penguin Journey uses Ruffle, so why can't I?
Running Ruffle in Firefox:


No luck.
In the Solero discord, they'll direct to this blog post:

This method does not work on Mac M1/M2/M3. The program is "out of date" and you cannot run it. It works on Macbook's running Sonoma and backward. I'm on an M3 running Sequoia.
they'll often post this video in the discord:

In theory, this method should work, and it does for many, but for whatever reason, not on my M3. I tried different versions of Ungoogled, I tried so many different patches of Pepperflash, and it never cooperated. I tried Pepperflash, I tried Fast Patch!, I tried dedicated Flash browsers, running Flash plugins for Pale Moon, Ungoogled, Waterfox, but I could never get past him.

Every time I see this stupid penguin's face I'm filled with rage. But I am going to save you that rage!!!
If you get this method to work, yay! I could not. Maybe I don't know enough about patching, maybe I'm a little tech stupid.
WHAT WORKED: Using a dedicated CPPS desktop application that allows you to plug in a URL.
I give you...

He is your solution, your answer to
I discovered this solution through Solero's Discord, when someone answered a question re: playing online.

Waddle Forever was not what I was looking forever, but I noticed in their credits:
The electron client is originally forked from the Club Penguin Avalanche client. The server is based in solero's works in reverse engineering the Club Penguin server (Houdini server emulator). The media server is also mostly from solero's media servers.
And that's how I found out the solution: Using CPA Client
Download the CPAvalanche Client
It runs Adode Flash x64. Easy peasy.
(the instructions are in Portuguese, but for English users:
Navigate to releases.

And download this one:

Once downloaded, open.

Drag into applications.
Run http://play.localhost through the client:
Open CPAvalanche Client. It will direct you to CPAvalance once loaded, but you're here because you want to play play.localhost.
Navigate to CPAvalanche Client next to your Apple. Click Mudar a URL do Club Penguin.

Press Sim.

URL: http://play.localhost
Ok.

Press Login once the page loads, and...

That's it! No more penguin! Have fun :)
CREDITS:
Solero Discord / Waddle Forever / Wand / CPA Client / Solero.Me
#solero/wand#wand#solero#cpps#club penguin private server#cpps localhost#club penguin#macbook#macbook silicon#mac m1#mac m2#mac m3#apple silicon
2 notes
·
View notes
Text
📁 Resamplers on MacOS.

For this tutorial, we will be running resamplers on OpenUTAU for MacOS. There are several steps to this process before we can start manipulating the files. These steps include, installing Homebrew, and installing Wine. Do not worry, for this tutorial I will also be showing you how to Homebrew your Mac, and how to install the latest version for Wine. Before we get into this process, I need to clarify that it is only possible on MacOS 13.7.1 (Ventura) or later, as Homebrew has discontinued its service for any older versions of MacOS. So without further ado, let’s begin.
Section 1, "Installing Homebrew."
To install Homebrew you will need to head over to the Homebrew website.
https://brew.sh/
From here, you will want to copy the installation command, and open Terminal. If you are not familiar with Terminal, it is in your Applications > Utilities > Terminal.
In the Terminal control panel, you will want to paste the installation command into the console. It will begin running the installation.
The installation will pause and ask for your computer’s passkey. Input the passkey and the installation will continue.
If you are on Intel, after it installs the, “X code command line tools,” it may run into a fatal error when updating the Homebrew install. Do not worry, head over to, System Preferences > Security and Privacy, and scroll down until you see, "allow install--sh.” Select OK to continue.
Now it will run the rest of the install and you have successfully Homebrewed your Mac.
Section 2, "Installing Wine."
In order to install Wine, head to the WineHQ website.
https://github.com/Gcenx/macOS_Wine_builds/releases
Download Wine Staging from the Github releases page.
Drag the Wine Staging .zip to your desktop and extract.
After extracting the zip, run the Wine Staging application.
The Wine installer will run into an error since it is an external application downloaded from the internet. Head to System Preferences > Security and Privacy, and allow Wine access to run. After this, Wine will be installed to your computer.
After performing these two steps, we will then prepare the environment for the resamplers. Inside of Terminal we will want to begin a new session and run the installation for Wine Crossover.
brew tap gcenx/wine brew install --cask --no-quarantine wine-crossover
After running these two commands your environment is set!
Section 3, "How to run resamplers on MacOS."
Now that you have installed both Wine and Homebrew onto your computer, we will now begin the process for installing the resamplers into MacOS. Before we get started, I will like to clarify that for this step we will be converting the executables (.exe) into .sh files. That will be the result we want in order to run resamplers. Here is how.
1. From the OpenUTAU github release page, download the "Mac_Additional.zip." This will be the package we use to convert the resamplers into .sh files.
Mac_Additional.zip
2. Before we get started, let’s find the version of wine that you have installed.
For Intel MacOS . . .
Perform CMND+SHIFT+G, to locate the directory. Now input the following path, /usr/local/bin/. What you will be looking for is either Wine32 or Wine64. Depending on what you have will be important information for a future step. Remember this!
For Silicon MacOS . . .
Open Terminal and run the following command.
which wine
After running this prompt you will receive the location of your Wine installation. *( eg. /opt/homebrew/bin/wine ) Please copy this location as it is very important for the following steps.
3. Download the resampler of your choice, for this tutorial, I will be installing TIPS. Extract the resampler, and run OpenUTAU.
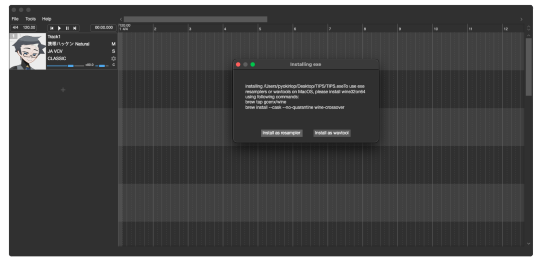
4. Drag the resampler.exe into the OpenUTAU window. It will then ask you if you want to install as a resampler or wavtool, select the resampler option since that is what we are working with today.
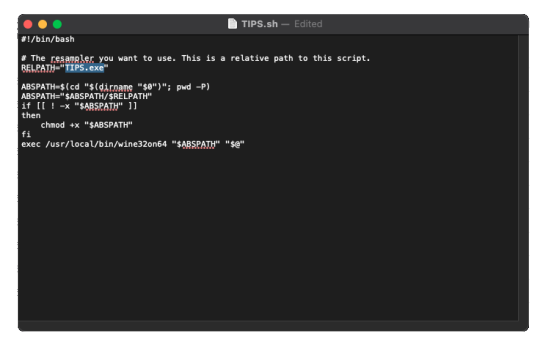
5. Extract the Mac_Additional.zip, by extracting it, it will generate a, “moresampler.sh,” file. Rename the file after the resampler you will be working with, *(eg. TIPS.sh ).
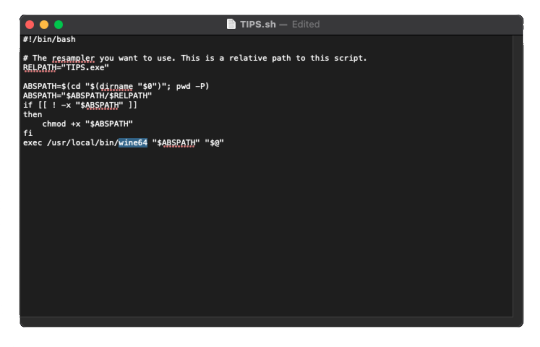
6. Open this file with textedit by double-clicking, or right-clicking. Select, “Open with textedit.” Now we will edit the .sh file with resampler's information.

7. Locate the, “moresampler-0.8.4/moresampler.exe” in the relative path and delete it. Replace with only the resampler name, eg. “TIPS.exe.”
For MacOS Intel . . .
In the field for, “exec /usr/local/bin/wine32on64“ replace the Wine extension with your version of Wine. This will look like, “exec /usr/local/bin/wine64,” since my computer is running Wine64.
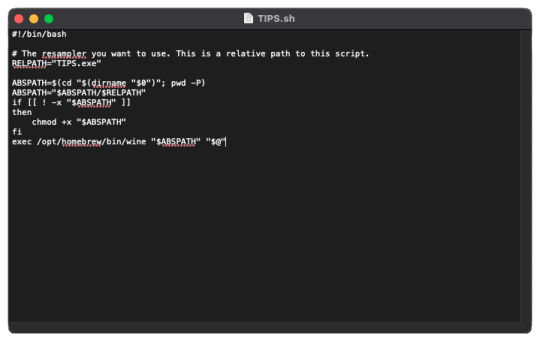
For MacOS Silicon . . .
In the field for, “exec /usr/local/bin/wine32on64“ replace this field with the location of your wine installation. This will may like, “/opt/homebrew/bin/wine." It should look like this!
9. In OpenUTAU, to quickly access the resampler folder, select the, “help,” tag, and, "Open Logs Location." We will not be working with the logs, from here you will open the resampler folder.
10. OpenUTAU will have already generated a .sh file for TIPS.exe in this scenario. With the edited TIPS.sh on your desktop, drag and drop it in the resampler folder, and replace.
11. Return to OpenUTAU, and select, “CLASSIC,” in the resampler field, and to the right there will be a cog icon. From here you will be able to select your downloaded resamplers.
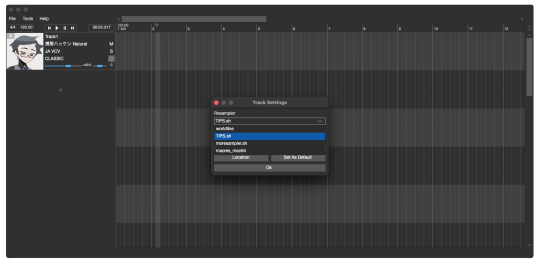
If this is your first time running the instance, Wine will be running the executable in the background for the first render. This will take awhile.
There you have it! You can repeat this process and download as many resamplers as you like.
3 notes
·
View notes
Note
hi!!! i love for custom blog theme,, do you have a link to the code or creator 0:?
ya!
so my theme is actually a heavily modified version of redux edit #1 by lopezhummel (current url: holyaura). i always remind users that most tumblr themes are old and that you'll need to replace all instances of "http://" in the code with "https://" so tumblr will save the theme. i had to do it with this one
these are the modifications i made to the theme. i edited this theme over the course of at least a year or so and don't quite recall how i did all of these things. but to the best of my ability:
i moved the "left side img" to the right side of the screen. i also made this element "responsive" so the image will never get cropped when you resize your screen. this was a bitch and a half to figure out and i truthfully do not remember how i did it
i deleted the text in the drop-down navigation so it appears as a little line that is otherwise not noticeable. this type of theme, the "redux edit," used to be very popular because having a drop-down menu let you cram a bunch of links that lead to sub-pages on your blog. i've done away with my sub-pages, but i still like the format of the "redux style" tumblr theme, for its minimal UI and for its customization options.
i separated my mobile description from my web description for formatting reasons. basically, most elements in tumblr themes are connected to specific text fields and toggles. i simply went to the section that was connected to my blog description and deleted it. the web description has to be manually typed inside of the CSS/HTML editor when i want to change it. whereas my mobile description is whatever i type in the "description" box of the normal tumblr theme editors.

i added code someone else made ("NoPo" by drannex42 on GitHub) which allows you to hide posts with certain tags on them. i did this to hide my pinned post, as it looks bad on desktop.
i replaced the tiny pagination arrows at the bottom with images that literally say "next" and "back" because the arrows were far too small/illegible. i know they aren't centered in the container i'm not sure how to fix that lol

i added a cursor

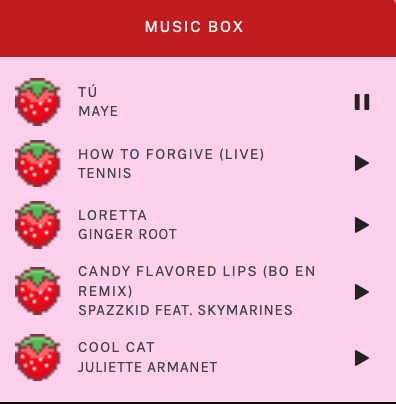
i installed a working music box ("music player #3" by glenthemes), and then added music by uploading MP3 files to discord and then using the links of those files as the audio sources. iirc i also had to make this element responsive and i aligned it so it would sit on the left side of my screen. i made the "album art" for each one the same strawberry pixel art
the moth is just a PNG i added and then moved around so it was behind my sidebar using the options that came pre-packaged with the theme
if you want something like the strawberry shortcake decoration at the top (called "banner" in the theme) your best bet is to google "pixel divider"
theme didn't support favicon so i added that in so i could have a little heart
ALSO:
this theme is. really weird about backgrounds. any background that i have ever set for it, i've had to do weird shit in photoshop. like making the background HUGE, mirroring it, etc. - because it would crop the image weird, or there would be a gap where there was no image. idk man, it's haunted. i'm sure there's a way to fix this but i am NOT tech savvy enough. anyway, patterns are probably your best friend. and if you DO want something that isn't a pattern, it's going to take a lot of trial and error. but i love this theme so i deal with it 😭
the sidebar image and the floating image do not scale. if your image is 1000 pixels, it will display at 1000 pixels. you'll either have to edit the code so that the theme scales the image for you, or resize any images before you add them
my white whale of theme editing (aside from the Weird Background thing) is that i cannot get infinite scrolling to work. i have tried every code out there. all of them break my theme. it makes me sad because like. i have music there for a reason. the idea is that people would listen to it while they scroll. unfortunately, the way it's set up now, the music will stop every time someone clicks "next" or "back" 💀
anyway sorry for rambling but i hope you enjoy the the theme and customizing it in the way that you want to!
24 notes
·
View notes
Text
Audacity for Debian-based Linux
So, some time around 2020/2021, Audacity for Linux from the repositories of Debian-based distros (including Ubuntu, Mint, etc.) no longer had access to high quality stretch (change tempo, change pitch, shifting slider). This appears to be due to a combination of Debian no longer updating Audacity at all past 2.4.2 (as Audacity's new owners from 3.0.0 on have had...issues, to put it lightly), but also the fact that 2.4.2 specifically was requiring a version of the SBSMS library past what Debian had. It's still the case that the apt version of Audacity on Linux Mint still lacks the high quality stretch functions.
The workaround for this is to compile from source. HOWEVER. Be apprised that if you specifically go for version 2.4.2, there is still a bug around SBSMS, which causes Audacity to crash when attempting high quality stretching. Apparently, if you go for versions afterwards (3.0+, new Audacity owners), or the version before (2.3.3), you will not run into this issue.
I am stubborn, so I have verified that I can now open Audacity 2.4.2 and do a high quality pitch change without crashing. Here are the solution options. Know that both are still compiling from source.
Option 1: Do it manually command by command on the terminal
You will, however, notice that the important download link for the patch is broken. You must get it from here.
Note that you should preface all of the commands listed in that post with "sudo", or they will likely throw an error. (Or do whatever you need to for terminal to continuously recognize root access.) In addition, note that the "pre-installation test" section is not optional. Audacity will not run if the "Portable Settings" folder is not created, and furthermore, the "Portable Settings" folder and all containing files need to have write permissions enabled to the relevant non-root group/owner.
Whether you installed manually or used the script, you will need to go to "/usr/local/share/audacity/audacity-minsrc-2.4.2/build/bin/Release" to launch Audacity. In the file explorer window, you can click the button to the left of the magnifying glass to switch to text input where you can copy and paste the above path. Or, from /home, go up one level, and then navigate through manually.
Change the launcher's icon and add it to the start menu/desktop, per your specific distro and desktop environment.
Option 2: Modify and run a bash script
I found a helpful Youtube video stepping through the process, before they link to a bash script automating the whole thing. However, the script does not include the 2.4.2 patch. There are also a few modifications that need to be done to the script.
Modifications to make (right click the .sh file, open with, pick some text editor):
Line 35: change the dl_directory to match your own system. (Specifically, you probably need to replace "piuser" with your own account name.)
This change also needs be done on lines 115, 116, and 120 (or replace the hard coded parts with "${DL_DIRECTORY}").
Line 77 (optional): add "patch" as a dependent package to check. Like Python, it's mostly likely already installed, so you could leave this commented out.
Lines 139-142: Not a modification, but a note that I didn't end up using this (left it commented out), so I did have to download the 2.4.2 source code from fosshub manually and put it in the location specified by dl_directory. I also put the patch there. If you do want to try to automate the download, you'll not only have to add another line to also download the patch file, but both the source code for 2.4.2 and the patch have hyphens in their urls, so you need to either add backslashes to escape them, or enclose the entire url in quotation marks. But I also can't guarantee that either of those things will work, since I ended up doing the downloads manually.
Line 150: Per the manual installation above, the patch needs to be applied before the build. Add this code block at line 150 (after the script checks to see if the "Build" folder exists):
#SBSMS patch required for 2.4.2 if [ -f "${DL_DIRECTORY}/changepitch.patch" ]; then sudo cp "${DL_DIRECTORY}/changepitch.patch" "${DIRECTORY}/${VERSION}" fi sudo patch -p 1 < changepitch.patch
That's it for changing the script. Save it, close out of the text editor. (If you decided not to try letting the script do the downloads, then make sure you download the source code and the patch and put them in the dl_directory location at this point.)
Enable the script to be executable. (Right click the .sh file, Properties. On the Permissions tab, check that "Allow executing file as a program" is checked.)
Double click the .sh file. I suggest doing the "Run In Terminal" option so you can see the progress. (And if it's really short, probably something went wrong. The build section takes 20 minutes.)
This script does not include installing the offline manual for Audacity. That is covered in the guide posted in Option 1. Sorry, you'll have to do some terminal typing after all.
Whether you installed manually or used the script, you will need to go to "/usr/local/share/audacity/audacity-minsrc-2.4.2/build/bin/Release" to launch Audacity. In the file explorer window, you can click the button to the left of the magnifying glass to switch to text input where you can copy and paste the above path. Or, from /home, go up one level, and then navigate through manually.
Change the launcher's icon and add it to the start menu/desktop, per your specific distro and desktop environment.
#linux#linux mint#ubuntu#debian#audacity#category: other#vibrating at the mashups now once again at my fingertips
9 notes
·
View notes
Text
SO UM. I honestly didn't know how many people didn't know about xkit because it's so baked into my experience of what makes tumblr function that it's just baseline.
SO. FRIENDS. DARLINGS. M'DEARS. If you use tumblr on desktop, xkit is your best friend. Firefox? No problem. Chrome? No problem. It's here for you.
Want Quick Reblogs? Want Quick Tags? A list of tag bundles you can click on and call it a day? To keep track of what you've already reblogged? Anti-capitalism tools? More accessibility options? Mass delete, mass edit, mass private, mass unlike? Automatically shorten long posts? Auto-tag queued posts? Gray out posts you've already seen? All of those are toggleable features with xkit, plus other features.
(alas no mobile version that I know of.)
Do with this knowledge what you will. 👀
7 notes
·
View notes
Note
Apks & desktop patches for Spotify 🤨🤨🤨?? Details?
Sorry I saw this so late I hope you see this anon 😭
I usually just find mine by searching 'spotify premium apk' on my phone. it is a bit trial and error though since not all of them work and I personally don't like the latest versions UI so finding a working one with the version you want is a bit of a long process.
^^^ the one I'm using for version 8.7 (though there are files out there fo different versions both older and more recent if you search)
I deleted and redownloaded it today just to double check it still works and it does seem to so hopefully it does for you too!
For the desktop app patching, I used the method in this video
youtube
Which disables banner audio and video adds in the application. The patch code is on GitHub though so stay safe and don't download stuff you don't trust, use an antivirus etcetc 👍
9 notes
·
View notes
Text
Also, just in case, here's a Mega link to my game's files.
One reason why I did this is because Github's desktop app is showing me stuff about "This diff contains a change in line endings from 'LF' to 'CRLF'" and I don't know what that is.
Whatever it is, I imagine a worst case scenario where I delete the Github page and make a new one for the game. But also because it's another way to preserve my game, even if not as quick or convinient. I try to change the version of the game in the folder at least once a day, before going to bed. https://mega.nz/folder/6EBBAKZL#Dtn2jjtcuaMRdofv03r7eg
Also just remember: Godot version is 3.5.1
#gamedev#indiedev#indie dev#godot#godot engine#indie games#blog#video games#game development#game dev#gaming#godot game engine
3 notes
·
View notes